7.31.2008

Photoshoping made easy

Being a designer, I need to work with Photoshop (sometimes). Now, I’m no pro, but I thought I could go a good job of color correcting pictures. When we hired our wedding photographer, I didn’t want them to do any color corrections because I could do it myself (and save extra $$$ at the same time) little did I know it isn’t as easy as it seems. I wanted pictures like I’ve seen on various wedding photographer sites, but all my corrections looked nothing like what they have.

At the beginning of the week one of my fellow bees (Lemon) introduced me to Totally Rad Photoshop Actions. Now for the ones who don’t have a clue what I’m talking about, actions at recorded steps in this case to improve/color correct you photos. They are extremely easy to use - you literally just click on the play button.

Here is a picture from my after wedding photo shoot, that I absolutely love. I attempted to edit it, using one of their sample action called Super fun happy:

Before:After:

As you can see, it really add that dramatic effect. I played with it a little...so I did more than just click on the play button, but still I think the outcome is perfect... almost as though I was a professional color corrector ;)

If you visit their website you can see tonnes of before and after shots. That way you get a glimpse of all the possibilities. Here are other before and after pictures… see the difference. Its stunning and adds that WOW factor.

Before:

After:

Before:

After:

If you have Photoshop (CS2 or higher) and would like to experiment with these awesome actions, visit their website to receive their samples. But if you want to plunge in the world of hours and hours of fun and easy editing, I would suggest you purchase their action kit. (but you really need to do lots of photo correcting for it to be worth it)

Plus, Totally Rad recently won the Bludomain Actions Of The Year contest, and to celebrate they are putting all their awesome tools on sale through midnight 8/3/08. Save up to $25. How awesome is that!

Will you be attempting to color correct your own photos? What tools will you be using?

Image source: Totally Rad

Bridesmaid Gifts

Gift giving is always fun, but its extremely hard when all your Bridesmaids have different personality and style. I still wanted to give them the same gift, so that they would all have something in common and representative of the wedding.


I personally had a really hard time figuring out what I would give them, but after months of searching I finally found something I think they all would like. Since pink was an important color in the wedding I decided to have a pink themed gift.

I got the girls a bag of goodies. Inside: personalized pink silk jewelry rolls. I thought this was a classic gift that can be used to secure all their jewelry. Youngest sister flamingo, doesn't wear jewelry, but she has piercings galore. I figured one day, she will use it, or in the meantime will store her body jewelry in it.


The second part of their gift, was one Pink 2GB SanDisk Cruzer Gator. I thought this was perfect for them to keep all their photos and important documents. I know I use Flash cards all the time, I just hope they will too.
I also added a journal for each girl. Where I wrote on the first page a personalized note. I mostly thanked them for being part of my wedding and sharing in our special day. It was nice seeing them open their gifts and get all teary eyed when reading the message.

For my MOH I got her a little something more. Since she was stressing out more than me, I got her a gift certificate at a beautiful local spa - perfect to relax, and after helping me out with the wedding... a spa seemed really nice.

They seemed really happy with their gifts... I hope they use them well. Did you give your bridesmaid a themed gift?


Images: Jewlery Rolls , Flash Card
, Certificate
Photography: IPI - Events

7.27.2008

Photo Shoot: DIY Bouquet

On Friday, I had my wedding shoot, you know ... so that I can have nice pictures of Mr.Flamingo and I, because our wedding photographer didn't deliver. I went all out, I went to the hairdresser and I got my makeup done like I was getting married all over again. (I feel a preview pic coming up....now!)


I realized I needed a bouquet for the shoot, but didn't feel like spending an arm and a leg for a fake wedding bouquet. Since I wanted to DIY my flowers for my wedding but that didn't fall through, I decided to attempt my first DIY bouquet, and I was really happy with the results.

I had peonies for my wedding blooms but that was out of the question for this DIY bouquet (they are no longer in season in July) so I opted for inexpensive off white minature carnations. Since they are full bodied flowers, when putting them together look very similar to peonies.

Here are the steps to making your own bouquet:

Materials:
1 - Flowers of your choice (miniature carnations - 9.99$)
2 - Floral tape (1.00$)
3 - Corsage pins (1.00$)
4 - Wide satin ribbon (2.79$)
5 - Scissors or Cutters (0$)


If you buy your flowers several days in advance, I would suggest putting them in a cool place. Since Mr.Flamingo LOVES the AC, our apartment was as cold as a freezer which was perfect for the flowers. If your fiance isn't an AC fanatic, best put the blooms in a fridge (preferably food free, otherwise your flowers will grab the smell of yesterdays meal.) I prepared my flower the day before the shoot that way, it was less work the day of.

Step 1: Remove all thorns, leaves or bruised petals on each stem. If you have more than once bloom per stem, you can separate them (but make sure you have a long enough stem (minimum 5 inches)


Step 2: Make clusters of about 5 bloom and wrap the stems with the floral tape. Make sure you stretch the floral tape so that it sticks well. Leave a good 1.5 inches of stems floral tape free. That way you can put them back in water and your flowers will have all the water they need which result in less withering.

Step 3: Once you've completed all your clusters, start bunching them together to make one big cluster. Use your floral tape to secure the clusters into one big handle. Again, leave a 1.5"-2" free at the bottom.

Step 4: Cut all the stems to the same length. Making a clean cut handle.


Step 5: Starting at the top, wrap your handle with the satin ribbon overlapping each turn. Once you've covered all the floral tape, take yours corsage pins and pick them in a angle (towards the floor) You can do any pattern you like, I simply went all the way down.


Voila your bouquet is done. Place your bouquet in water until the very last moment (when your ready to take your bridal pics) A professional looking bouquet for the fraction of the costs. My bouquet cost me only 14.00$ to make. Beats the florists 100-125$ fee don't you think?

7.25.2008

Glamuptials: Beauty time (Part 1)

When I had my hair trial, I felt there was some vintage missing in my do. I followed what many of yous suggested and asked my hairdresser to make me some finger curls. I didn't go for a second trial, because my hairdresser insisted not to, so I only saw the final product the day of my wedding, I know - crazy.

The day before the wedding, I went to get my hair washed and get my curls started. It took a long time, because well... finger curls are a unique request now a days. Plus, I was lucky, I got to sleep will all kinds of hair pins (ya like the huge black one) to make sure everything stayed in place for the morning after. (But regardless - I slept like a baby)

Here is the morning of... I look like I didn't sleep alot (which is true indeed - I was finishing up my moms jewelry until 2am - Crazy Flamingo! I know) But regardless I slept quite well. Plus my MOH kept me company all night, so I wouldn't feel an empty space in my bed.

I had given my younger sister the camera but she didnt do a great job of taking pictures, so these are random pics of my hairstyle (which by the way I LOOOOVVVVEEEEDDDD)

Close up of the curls and my beautiful rhinestone comb.

Don't even ask me what I'm doing here, seems like quite an awkward pose.
I guess my friends were trying to show EVERY angle ;)

Everybody loved my hair, with the exception of my mom. Lets just say my mom felt she needed to tell everyone in my family that she disliked my hair so when it came time for the receiving line, I would be greeted with "Congratulations, and I love your hair by the way, don't listen to your Mom... you look gorgeous and your hair matches your vintage theme"

I was a bit shocked about the whole thing, I mean why would my mom do that. Plus its not like one person mentioned this, but at least 5 different people. Why? I have no clue, but I let it slide. I loved my hair and thats what counts right?

If I were to do it all over again (wait I am.... I am having my photo shoot today) I would go for a vintage hairstyle hands down. I say the hell with what everyone says... do what you want. Its your wedding :)

7.24.2008

Glamuptials: Decor elements

If there is one thing I loved about my wedding, was definitely my decor elements. Everything was perfect, from my photo corner to my menus. I know, I went crazy with the details but at least my guests pointed out sometime during the evening. Plus, they still tell me now... how beautiful everything was. Hurray I've accomplished what I wanted.


The overall feel and look that I wanted for my reception site was easy: vintage and glam. The wedding show people did a great job adding some extra glamour elements to the decor, but the hard work paid off.


This is a last minute DIY project, I made reserved seating cards for Mr.Flamingo and I. I made cards using the same elements as our invitations. I ppted for Bride & Groom because in french Bride = Mariée and Groom = Marié, not much of a difference and with a little too much to drink I sensed some confusion. The words in english seemed perfect, and no one else read them but us. I used ivory satin ribbon to attached the cards to the back of the chair.


I had mentionned before wanting to have inexpensive linens or something in chocolate brown to cut the white linen that were provided by the venue. Well with lots of research and very little time left to the wedding, I came to the realization that nice/inexpensive wasn't possible. So I decided to DIY my table decor. I opted for table runners (to cut costs) but I didn't have time to take pictures, and I don't know if I would of because lets just say : I can't sew for my life actually I can't even cut long length of material in a straight line. So ya, I wasnt too proud they weren't very straight. ;) (But no once noticed - luckily)


Our beautiful menus. Every guest got a menu carefully tucked in their napkin. I printed them in brown to add some extra color to the table and the type was in ivory. My menus were long an narrow to add length to the place seating. My menus were in French, English and Italian.


Our guests liked our centerpieces but loved our table numbers. In my flickr account, where my guests uploaded their pictures, I have over 10 shots of just our table numbers. I'm glad they liked them, because I LOVED them and its heartbreaking when you work so hard on something and no one pays attention.

The escort card tree was such a beautiful piece. They actually installed spots at the bottom of the tree so when it got darker the crystal swags would shine. What I loved too, is that they made the bottom match my centerpieces. They used square mirrors to surround the pot and added sticker rhinestones for the glam.

The photo area was great. We took lots of pictures with our friends and family. We had rented the lamp posts, but didn't know how to place them in our hall. The wedding show rented bushes and placed it as though it seemed we were outdoors. We kept the bench (we bought it from Wal-Mart) so I'm excited to put in outside once we have our first house.

Whats your favorite decor element at your wedding?
Up next: Glamuptials: Beauty time

7.20.2008

I should of listen to my gut

My photographer is one of the first vendors I hired. I chose this company because I knew the owner, so I got a pretty good price. I looked at their work and it seemed nice at the time. Of course there were some imagery that I didn't really like, so I was clear and mentionned what I liked and disliked that first time around. Since I am a designer, I wanted to have all the high resolution images on a DVD. I also got all the rights to the photos, meaning that I don't need permission from them and I can do whatever I want with my photos. I also asked them not to edit my photos, and I would do it myself, so basically I was paying for the photographer.

Throughout the planning process, I realized that there were so many other photographers out there that I loved more than my own. Of course their work was more expensive then what I got my photographer for (1100$)... and being a budget bride and not wanting to loose my 300$ deposit, I decided to stick with my photographer. Basically... I should of listen to my gut and switched.

I was unsatisfied with his work. He seemed shy and didn't direct us in nice photography poses. Don't get me wrong, there are some beautiful shots... but not enough. I mentioned that I wanted pictures of all the details. He took some detailed shots, but none of my bouquet, or the girls bouquet, of Mr.Flamingo superman cufflinks. I mean he stayed with Mr.Flamingo for 15 minutes... with a total of 20 photos and all the nice artsy pictures, Mr.Flamingo asked him to take. Then when it came time to take family pictures, we stayed at the same spot. We had beautiful spaces outside but he wasn't creative enough to give suggestions on what we should do. He didn't take pictures of me alone with my dress and certainly no fun pictures with the girls. I'm really disappointed. But thats not the worst part...

After the ceremony, Mr. Flamingo, the bridesmaids, the best man and myself, went to take some pictures. Obviously this was the time to take pictures of Mr.F and I. Well that didn't really happen. Out of all the photos, and that I mean from the ceremony to the first dance, we have only 5 nice pictures of us. Yes I am not kidding you 5 pictures. This is so devastating because its our wedding and we have no pictures of us. Plus, on your wedding day.... you shouldn't have to think about what pictures you should take because obviously you hired a photographer to do that... but thats not how I felt. It was like I was telling him what to do... so the pictures I didn't mention... well I didn't get. This is when you realized doing photo cards is the best idea ever!

Luckily one of my good friends just finished her photography course and is planning on starting her own business. Since she has nothing in her portfolio she offered to re-do a wedding shoot for FREE. She is really good and we have the same ideas and sense of style/creativity so I'm certain the pictures will be beautiful. I am happy that I get to retake some pictures of Mr.F and I, plus I get to wear my dress all over again... what fun! The only thing is that I won't have the same hair (because I did the after wedding chop) and I'm debating if I should get a bouquet done. But what Im really stoked about - I get to wear my birdcage veil that I had forgotten at home. Hurray for birdcage veils! The photo shoot will be some time this week... so Im excited about that. I hope things go well!

My piece of advice, make sure you do lots and lots of research before hiring your photographer. Many have pre-wedding shoots or engagement photos... this is a great thing, because you have an idea what the chemisty with your photographer will be like. And... if you feel that you won't like the person you hired, don't do the same mistake I did... switch (especially if your budget allows it) Pictures are once, and if they arent done right... you can't go back.

Were you disappointed with your photographer? Did you retake some pictures to compensate?
7.18.2008

Vectorizing crash course 101

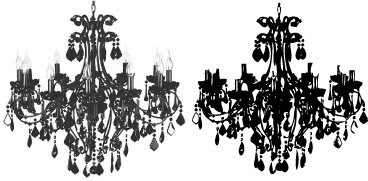
Ever since I've blogged about my invitations, I've been receiving emails left and right about my chandelier illustration. I guess I didn't explain it in detail, so I figured - what the heck, here is Flamingos Vectorizing crash course. Now I'm no pro at this, I literally learned about Illustrator CS2 Live trace option at the beginning of the year (thanks: Bird of Paradise, Lemon and Plumeria)

A reader asked me if I could vectorize an image for her. A chandelier of course. Here are the steps to have an vector with no needs of doing hours of tracing with the pen tool. Hurray for live trace!!!


Now to be able to trace any image you obviously need to have the software. Adobe Illustrator CS2 or up, for those of you who don't have it, you can download a free trial : here.

Next step is you need to find an image. A photograph, illustration whatever you want. But sometimes the live trace tool can be a little funky so you basically need to do several trials and errors. Once you get the hang of it, I promise you will love it.


Step 1 - Open your image in Illustrator
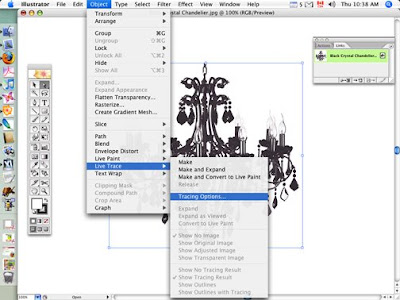
Step 2 - Select your image and go to Options > Live Trace > Tracing Options


Step 3 - In the tracing options tool box theres the option to lower or higher the Threshold (meaning more or less black). If you click on the preview box and play with the intensities you will see what your vector will look like. Once you've gotten to a shape you like, click on the Trace button (in blue)


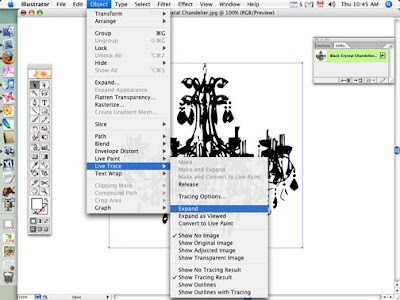
Step 4 - Now you have a vectorized image but you do not have the clipping path.
Select your image and go to Object > Tracing Options > Expand


Your vector has been created in black and white, but if you want to be able to put your image on a colored background, you don't want the white showing.

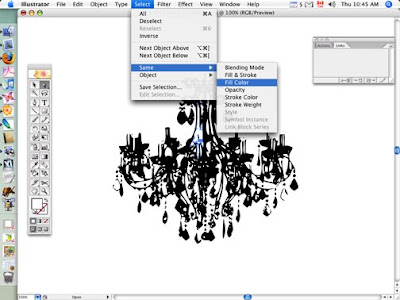
Step 5 - To remove all the white from the vector choose the white arrow tool found in your tool bar. Click on a white part in your image (usually the center is a good choice) then go to Select > Same > Fill Color once you see that all the white parts are selected press delete.


Voila your vector is done, now you must save it as an EPS file format.
To do so go to File > Save As > EPS

EPS files can be used in majority of Adobe programs (like InDesign, Illustrator and Photoshop) If you want to change the color of your vector, its always better to do so in the original program. Changing the color can be done using Photoshop. Basically its what your most comfortable with - in the end.

Enjoy!

7.16.2008

Glamuptials: The Guestbook

I know you are waiting impatiently to see my wedding photos as a whole but I have to stretch the suspense a little longer. You all know I like labeling stuff with words that I make up, so this was no exception to the rule. I've decided to officially call my wedding/pro-pics posts Glamuptials.


definition: (noun, pl - the meshing of two words.
Glam which is the shortened form of glamour and nuptials -
a wedding)


The first installment of glamuptials will be about my guestbook. I realized that throughout the planning process I never blogged about what I was doing for that. I was lucky enough to score me one of Zinke Designs Wishing Well. Its a beautiful ivory floral magnetic box with 150 4x6 cards and a pen. Pretty for display and perfect for storage.


I was searching for a bowl or something where I could place the cards in. Then, Mommy Flamingo to the rescue, pulls our a vintage crystal dish. It was perfect... and vintage (it belonged to my great-grandmother). Plus, don't the cards look better in a pretty dish?


The guestbook table was really a family thing. Flamingo step-mother purchased candelabra shaped miniature trees. Yes yes... I am not kidding you, the branches of the trees are shaped like a chandelier. I couldn't believe my eyes. It was the first time I had seen anything like that.

A lady who works with Daddy Flamingo mentioned that she had a vintage typewriter which might look nice with my whole vintage theme. I was so excited about this, so I sort of pulled a Lovebug. (thanks for the inspiration) I spent hours cleaning the thing, it was filled with dirt and dust... but in the end something beautiful never looses its beauty.


I had a fun ready what our guest left as words of wisdom. Unfortunately, not many people left us notes, so we should of made an announcement somehow, but it doesn't really matter. My favorite message was from my cousin "Mr. Flamingo, my cousin is always right, remember that... or I'll kill you!" lol

What was your favorite guestbook message?

{All images courtesy of: Ipi-Events Photography}

7.15.2008

Gimme Photos and more Photos

I had mentioned that I wanted to put photo cards on the tables so that the guests could upload their own wedding photos. After much debate I decided to go with Flickr. Simply because you could upload the pictures directly - no need to download a program. I designed a folded card which I placed on each table. They were bilingual (French & English) with a message on one side and the instruction on the other.


In my last post, many of yous mentioned that you were interested in knowing what I was going to write on my cards...Well I am happy to share it with yous.

Front page:
Share your memorable photos with us!

We would love to discover your amazing photographer talents!
We invite you to upload your photos & videos on a photo sharing website where all of our family and friends can admire your creations taken throughout our special day.

The more photos and videos the merrier!
Looking forward to seeing the great photos you took

Mr. & Mrs. Flamingo xox
Inside page:
Username: xxxxx
Password: xxxxxx

How to use Flickr.com
1 - Save photos onto your computer
2 - Go to www.flickr.com
3 - Log in using username and password
4 - Start uploading photos and videos
5 - Name and explain photos and videos

Don’t leave anyone guessing. You can explain what was being photographed, include comments about the day or write an amusing caption to go with your uploaded pictures.

Did you happen to miss anything ? View all the moments that you might have missed. Thank you for sharing in our wedding day!
Because I knew many of my friends were going to take pictures and they would all be over 1 MB each, I investing in the Flickr Pro account, for just $24.95 (U.S.) per year. I did a great thing because the free account only allows for 100 MB of images and as of now, I have over 500 pictures from my guest and more are to come.

Here are some of my many pictures taken by my family and friends:


Our beautiful church


Exchanging vows


Partying away


Our first dance

If your debating whether or not you should do this... I say yes all the way. Its a 24.95$ well invested, especially when you were disappointed with your photographer. (more to come on that) Did you have photo cards? Was it worth it for you as it was for me?