Ever since I've blogged about my invitations, I've been receiving emails left and right about my chandelier illustration. I guess I didn't explain it in detail, so I figured - what the heck, here is Flamingos Vectorizing crash course. Now I'm no pro at this, I literally learned about Illustrator CS2 Live trace option at the beginning of the year (thanks: Bird of Paradise, Lemon and Plumeria)
A reader asked me if I could vectorize an image for her. A chandelier of course. Here are the steps to have an vector with no needs of doing hours of tracing with the pen tool. Hurray for live trace!!!
A reader asked me if I could vectorize an image for her. A chandelier of course. Here are the steps to have an vector with no needs of doing hours of tracing with the pen tool. Hurray for live trace!!!

Now to be able to trace any image you obviously need to have the software. Adobe Illustrator CS2 or up, for those of you who don't have it, you can download a free trial : here.
Next step is you need to find an image. A photograph, illustration whatever you want. But sometimes the live trace tool can be a little funky so you basically need to do several trials and errors. Once you get the hang of it, I promise you will love it.

Step 1 - Open your image in Illustrator
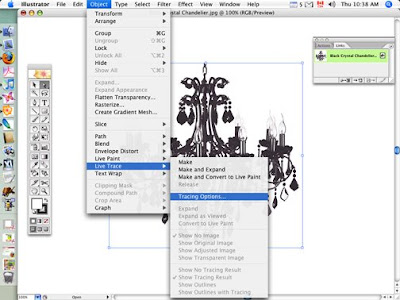
Step 2 - Select your image and go to Options > Live Trace > Tracing Options

Step 3 - In the tracing options tool box theres the option to lower or higher the Threshold (meaning more or less black). If you click on the preview box and play with the intensities you will see what your vector will look like. Once you've gotten to a shape you like, click on the Trace button (in blue)

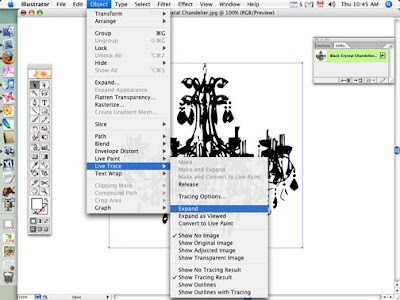
Step 4 - Now you have a vectorized image but you do not have the clipping path.
Select your image and go to Object > Tracing Options > Expand

Your vector has been created in black and white, but if you want to be able to put your image on a colored background, you don't want the white showing.
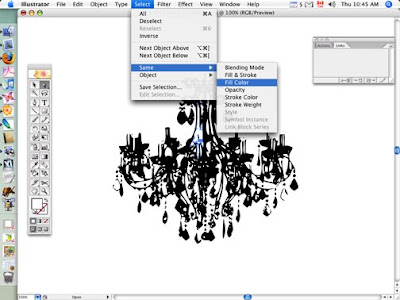
Step 5 - To remove all the white from the vector choose the white arrow tool found in your tool bar. Click on a white part in your image (usually the center is a good choice) then go to Select > Same > Fill Color once you see that all the white parts are selected press delete.
Step 5 - To remove all the white from the vector choose the white arrow tool found in your tool bar. Click on a white part in your image (usually the center is a good choice) then go to Select > Same > Fill Color once you see that all the white parts are selected press delete.

Voila your vector is done, now you must save it as an EPS file format.
To do so go to File > Save As > EPS
EPS files can be used in majority of Adobe programs (like InDesign, Illustrator and Photoshop) If you want to change the color of your vector, its always better to do so in the original program. Changing the color can be done using Photoshop. Basically its what your most comfortable with - in the end.
Enjoy!
Enjoy!


No comments:
Post a Comment